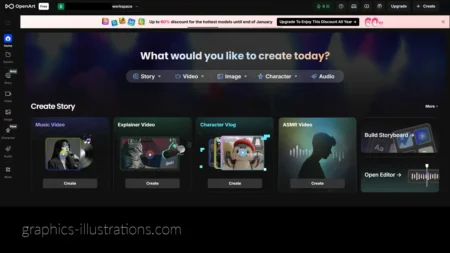
Gang, creating photo manipulation of wedding images is getting more and more popular. And for a good reason too. Wedding photos make great polygon for Photoshop exhibitions and I made one too :)
So, if you are interested to learn about wedding photo manipulation, here is a little tutorial!
Ingredients:
1. Here’s my choice for today’s Wedding Photo Manipulation.
- For this tutorial you will have to use your own image of the bride, but, just for learning purposes you could use any image
- Trees (download here)
- Sky with clouds (download here)
- Moon (wikipedia download from Luc Viatour)
- Mr. Alphons I, Mr. Alphons II
- Photoshop brushes Hearts

Once got our ingredients ready, together with a cup coffee, let’s dive into it.
1. Since I had the image in RAW format, I tweaked it during the import
- in Lightroom I used Color Creative CP2 preset.

If you don’t use Lightroom, here are the color preferences for RAW in Photoshop:

2. Now apply same color preferences for the two background images

3. Open the image with the trees. This will be the main background.

4. Place an image with the clouds above the background image and use the “Hard Light” layer option, with 57% Opacity.

5. And now, let’s clean it up a bit.
- Add layer mask on the image with the clouds.
- Draw a rectangle in the “mask area”.
- Fill the rectangle with a gradient: from black to none (empty). The grass is hidden and the clouds will fit well in the scene.

6. Let’s copy the main background image (with the trees) using “Multiply” layer option, Opacity is at 68%

7. Lighten the grass in the front of the scene, because we want to emphasize the front. Add a layer mask, and again: draw a rectangle and fill it with a gradient: from black to none (empty)

8. Open the image with the bride and using the Quick Mask option “color” erase the background. Simply turn off Quick Mask when you are done and invert the selection area then erase it.

9. Now add a bride in the scene, just drag and drop. Place it under the tree and using Burn Tool darken the areas that will be in the shadow.

10. Using the Burn Tool darken the grass – create the shadow behind the bride, drawing shadow on the main background image.

11. Now, let’s add the moon. Open the moon file and using Elliptical Marquee Tool and “Shift” key draw a circled selection. Invert the selection and cut out the moon.

12. Color the moon with blue using Hue/Saturation.
First, set the foreground color.
Open Image – Adjustment – Hue/Saturation and check the Colorize option. Click OK, it’s done. The moon is blue.

13. Now create a layer set and change the set option into “Color Dodge”. Drag and drop the moon image into that layer set.

14. Now, copy the background with the trees as many times as you want to achieve the night feeling in the scene. I copied it four times. Merge all 5 layers (background images with the trees).

15. Now use the Dodge Tool, and lighten the image below the moon creating the moonlight effect.
Set up the Dodge Tool as shown.

16. Create a new layer in the layer set with “Color Dodge” style. Add some Hearts brushes (various sizes) and apply Filter – Blur – Gaussian Blur. Create another layer and repeat the same, but use less Gaussian Blur in order to create 3D effect. (How to instal and use Hearts Photoshop brushes – design an unique wedding invitation – video tutorial MP4)

17. Also use simple brush, with 0% Hardness and approx 30 px size.

18. I added a sleeping cat too. The process is the same as for the bride.

19. Another cat (same my Mr. Alphons) is added behind the tree trunk. Of, course, he is not behind the tree but dark bark was good to hide his body…

And here is out final result! Voila!
My cousin loved it, I hope you like it too!

In case you liked the Hearts Photoshop brushes touch, these are available in my Photoshop brushes store with commercial license so you can create commercial projects with them.
That’s all folks! Talk soon!
Silvia
P.S.
Our 250 color postcards give-away contest is still on [ends on 26 January 2012]! So, hurry up and enroll, nothing to do really just leave a comment… read more –>
Popularity: 1% [?]
Gang,
According to the Merriam-Webster Thesaurus, the definition of giveaway is:
“Something given to someone without expectation of a return.“
And this is exactly what are doing right now. Well, OK. it’s not really us, we are partnering with Next Day Flyers, on-line printing company which are:
- in business for 13 years
- using recycled materials
- offering next day printing service
- specialized in, well, printing of various marketing materials such as:
- brochures,
- custom business cards,
- greeting cards,
- postcard printing
- specialty die cuts
- and more … [find out more about Next Day Flyers]
“So, what’s on the table?”
- One lucky winner will get 250 4×6 color standard postcards printed on 14PT card stock and shipped right to her/his doorstep (as long as that doorstep is in US. If not, winner will be paying just for shipping)
“What do I need to do?”
- Not much really.
- Click “Like” button on Next Day Flyers Facebook page [click here]
- Leave a comment telling how would you use this giveaway (250 4X6 COLOR STANDARD POSTCARDS PRINTED ON 14PT). You can leave a comment on Next Day Flyers Facebook page OR here as a comment on this blog OR on Graphics-Illustrations.Com Facebook page. Either way – you are in.
“Who wins?”
- He who dares – wins! :) Well, there can be only one winner. Winner will be picked at random by Leslie who represents Next Day Flyers in this competition.
- Winner will be publicly announced
“When does the competition end?”
- Competition ends on 26th of January 2012. If you are reading this – there is still a chance – enroll now!
OK. Gang. That’s, more or less – it!
I hope you liked this post, the prize and we are awaiting for your comments, as we said, either right here, or on Next Day Flyers Facebook page OR on Graphics-Illustrations.Com Facebook page. Whatever you choose, don’t forget to click the “Like” button on Next Day Flyers Facebook page.
Love you all! Wish you best of luck! And, well, speak soon!
xoxo
Silvia

Popularity: 1% [?]

I noticed, ever since I started my Photoshop brushes business that many of my buyers are using Photoshop brushes to create their own custom stamps. And this is, mainly, for two different purposes (which sometimes overlap).
1. They use these stamps in their own DIY projects like scrapbooking or similar
2. And more often then not, they use Photoshop brushes to create designs for stamps which are then being sold to stamp buyers.
And this is all well. The whole idea behind my Photoshop brushes is to help you guys, not just create stuff for your own needs, but also to help you create new stuff out of it (like rubber stamps) and make some money along the way.
There are quite a few services out there offering custom stamps. Most of them offer quick and easy on-line stamp creation. Of course, although most of you will be interested in creation of custom stamps for your scrapbooking and DiY craft needs, still, you might want to have your own signature stamps as well. Or you might want to have a stamp with your logo on it.
So, in this little exercise, I wanted to see for myself how fast and how easy it is to create your own logo stamp with a little help from Photoshop brushes.
And, believe me, it was faster then I though. Before starting the process there are few rules to know.
- First, the image you’d like to have on your stamp must be in full black color. Your stamp can, later on, be in red or other color, but the image you are uploading must be black.
- Resolution of the image must be 300dpi. My brushes are in high resolution so this is not a problem.
- File formats: cdr, ai, eps, tif, psd, jpg, gif and pdf. Of course, in this case .jpg is probably our choice
So, the procedure is quite simple, create a new file in Photoshop, make it a desired size, but the resolution must be 300dpi, add a Photoshop brush which you’d like to turn into stamp and save the file in .jpg format. (Notice: You might want to crop image so that the blank space between the brush and the edge of the image is maximally reduced.)
Now, step two, on the stampxpress.com, you will go to “Design Your Own Stamp” option and upload the file. You may choose to have up to 20 lines in your stamp but in most of the cases, 3 should be enough. You also get to choose the font type, size, attribute (bold, italic, underline) and the alignment.
And this is how I created a stamp for Graphics-Illustrations.Com.
Finally, many of you will go and look for discount stamps. For these, as well stampxpress.com is probably the right address.
Popularity: 1% [?]
Gang, the year has just begun and I just know that some of you still didn’t manage to find the right 2012. calendar to fit your wall. So, here is one more option, I call it MeToo 2012. calender. For whatever reason.
So, all the months are here, days too, weeks … nothing is missing, I think, there is this space above the dates where you can fit your own image, photography, illustration …. so today, I proudly present you
2012 Printable Photo Calendar Templates – A3 and Legal size, JPG and transparent PNG
Each file is a zip archive and inside the archive there are two files:
- PNG version of the calendar where the image area is blank, so you can put anything you want there
- JPG version of the calendar, with hearts, just like the ones above this article
This image below is what I did for myself. It is the latest cat that adopted us and we named her “Seven of Nine” :)

| Download printable photo calendar template A3 size here (JPG and transparent PNG) – zipped |
| Download printable photo calendar template Legal size here (JPG and transparent PNG) – zipped |
And, if you like this blog, go ahead and click on G+ icon, follow us on Google plus!
To follow us on Google Plus click here:
![]()
Btw. in this calendar, again, I used 2012 Calendar Photoshop brushes.
2012 Calendar Photoshop brushes set
12 brushes in three designs and three sizes:
* up to 636 pixels @300dpi
* up to 1342 pixels @300dpi
* up to 2470 pixels @300dpi
- 36 transparent PNG files (approx. size 10 inches @300 dpi)
- Compatible with Photoshop 7.0 up to CS5- Compatible with Photoshop Elements 3.0 and newer versions
- Also compatible with PC/Mac
- COMMERCIAL LICENSE
But, you might also like these:
Swirled Trees Photoshop brushes set
- 20+20 Photoshop brushes
- Bonus trees brushes set (46+46) – trunk is separated from tree top for easier coloring
- Compatible with Photoshop 7.0 up to CS5- Compatible with Photoshop Elements 3.0 and newer versions
- Also compatible with PC/Mac
- COMMERCIAL LICENSE
Video Tutorial on how to use Swirled Trees Brushes Set: How to Use Swirled Trees Brushes Set
Birds Photoshop brushes set
- This set consists of 45 brushes up to 2498px AND 45 brushes up to 600px
- Compatible with Photoshop 7.0 up to CS5- Compatible with Photoshop Elements 3.0 and newer versions
- Also compatible with PC/Mac
- COMMERCIAL LICENSE
Birds brushes [These were also used in logo: Chris Turnbull Photography
Thanks Chris! :)]
All three sets are a part of the 800+ Photoshop brushes MEGA SET - click here to get the whole pack –>>
Other than that, I don’t have much to say. These days, I think, it is, important to keep yourself busy creating stuff, graphics, images, designs, photography …
Do something creative, enjoy making things up, bring joy and happiness to those who surround you.
Love, peace, happiness!
Silvia
Popularity: 1% [?]
Gang, it’s here, finally, 2012 is here.
I hope you had fun on the New Years Eve. For me it was not bad at all. Actually, I can’t remember when was the last time I danced so much :)
Well, now we’re back to the track ;) and it’s time, again, to make some useful stuff for you guys. And I hope you will like this one because, today, I proudly bring you
300dpi, print ready, Legal/A3 size, Calender 2012 – free download
I prepared two versions: horizontal and vertical so it’s up to you to decide which one will fit to your “creative wall” better.
Horizontal Printable 2012 Calendar – Legal/A3 size

Free Printable 2012 Calendar Download (Horizontal)
Vertical Printable 2012 Calendar – Legal/A3 size

Free Printable 2012 Calendar Download (Vertical)
In case you were wondering, I managed to create this Calender rather quickly (you could create a Calender like this in minutes actually). How? Why?
Well, easy. You probably guessed. I used the following Photoshop brushes to make it:
Swirled Trees Photoshop brushes set
- 20+20 Photoshop brushes
- Bonus trees brushes set (46+46) – trunk is separated from tree top for easier coloring
- Compatible with Photoshop 7.0 up to CS5- Compatible with Photoshop Elements 3.0 and newer versions
- Also compatible with PC/Mac
- COMMERCIAL LICENSE
Video Tutorial on how to use Swirled Trees Brushes Set: How to Use Swirled Trees Brushes Set
Birds Photoshop brushes set
- This set consists of 45 brushes up to 2498px AND 45 brushes up to 600px
- Compatible with Photoshop 7.0 up to CS5- Compatible with Photoshop Elements 3.0 and newer versions
- Also compatible with PC/Mac
- COMMERCIAL LICENSE
Birds brushes [These were also used in logo: Chris Turnbull Photography
Thanks Chris! :)]
2012 Calendar Photoshop brushes set
12 brushes in three designs and three sizes:
* up to 636 pixels @300dpi
* up to 1342 pixels @300dpi
* up to 2470 pixels @300dpi
- 36 transparent PNG files (approx. size 10 inches @300 dpi)
- Compatible with Photoshop 7.0 up to CS5- Compatible with Photoshop Elements 3.0 and newer versions
- Also compatible with PC/Mac
- COMMERCIAL LICENSE
All three sets are a part of the 800+ Photoshop brushes MEGA SET – click here to get the whole pack –>>
Popularity: 1% [?]
Guys,
Most of you already know I’m all about working from home and helping others to do the same. Working from home has many advantages and disadvantages.
However, advantages upbeat disadvantages and what happened to me a few days ago clearly proves it. I simply could not imagine or think of a nicer Christmas surprise gift then the one I got from a dear friend of mine: Fiona Watson.
And here is what I got from her:

Of course, Christmas tree ornaments immediately found their place on my Christmas tree! :)

Now, “What’s so special about these gifts?”, some might ask.
Plenty of things, but let’s just name the most important ones:
- Fiona is a person who I admire and respect so much. Getting a surprise gift from her makes this gift, well, very special.
- Fiona just started a work from home business, and it takes strength and courage to do that.
- The gifts she sent me are awesome (They represent the kind of items she sells on her ETSY Store [Link to Fiona's ETSY Store Figero Design ->])
- Some of the presents I got from her are decorated with my Photoshop brushes, so how could I be more proud and happy?
So. What can I say? Way to go Fiona! You are doing a wonderful job and I am sure your work will be a success on ETSY, so hold on there, keep on doing the great job and a 2012. will be a year of success to you.
Love you all! I hope this post helped at least some of you will find inspiration and encouragement for your own digital creative plans or projects. If you feel you should do it, just do it and next year will be the greatest year no matter what they say :))
Hugs&kisses everyone!
Silvia
Popularity: 1% [?]
I don’t know about you, but Christmas wreaths are, apart from Christmas lights, my favorite Christmas decorations. Oh, by the way, if you are into Christmas wreaths, check my post on DIY project, Make your own Christmas wreath (12 Facebook likes so far :)).
Now, back to graphics. And illustrations. Because this is the name of this blog, so let’s stick to the topic. (Although I might talk about life and the universe a bit later ;))
Ladies and gentleman, designers, art lovers, photographers and scrap-bookers,
the time has come for a vector art freebie!
Christmas Wreaths are waiting for you in the following formats (4 of them):
* AI (Adobe Illustrator 8.0 and newer versions)
* EPS (Encapsulated PostScript – more info on Wikipedia)
* SVG (Scalable Vector Graphics – more info on Wikipedia)
* CDR (CorelDRAW 8.0 and newer versions)
* PNG (transparent) – I know, I know… this is not a vector, but it may help you out!

[Download Christmas Wreaths, vector art here (zipped, 6,4Mb)]
Also, I’d like to use this opportunity and invite you to check out the latest Photoshop brushes set – [Free for Platinum GBG members only, which you might become if you want]:
Christmas Post Stamps (15 brushes in three sizes)

Preview Christmas Post Stamps Photoshop brushes (YouTube video)
And finally, how could I ever forget to invite you to see the legendary, the ultimate, the one and only 800+ Photoshop brushes MEGA SET, not just because of the loads of brushes, but also because of the bonuses and a 50% OFF coupon code for all Photoshop brushes I ever made or will do, forever and ever … and ever ->
xoxo,
Silvia
P.S.
Ugh, I just noticed a promised to say something about the life and the universe. Well, I know this one will not be unique and never heard of before, but, guys, peace and love! These are the most important message about the life and the universe we can share today!
Popularity: 1% [?]
This is third post of my Do It Yourself Christmas saga: first was Do It Yourself Christmas Wreath, then second Do It Yourself Christmas Photo Card and this, third, one is – Do It Yourself Christmas Labels (Photoshop brushes set).
So, dear visitors, friends, ladies and gentleman!
Graphic designers, web designers, scrapbookers, artists, photographers, videographers, Photoshop professionals and enthusiasts!
Today, I proudly present you nice and FREE for “commercial use” tool for your:
* graphic design projects,
* Christmas party invitations,
* Christmas gift labels,
* web design projects,
* photo books,
* rubber stamps,
* wallpapers,
* paper designs,
…whatever YOUR idea is – this one will make it happen:
Christmas Labels Photoshop brushes set
There are 4 label designs, but every label is made of 4 different shapes (for easier coloring) and they all come in three sizes.
[ PREVIEW CHRISTMAS LABELS PHOTOSHOP BRUSHES ]

But! This is not all! I, also, prepared a short video tutorial too, on how to use Christmas Labels Photoshop brushes. This tutorial will help you speed up the process of creation of Christmas graphics!
DOWNLOAD Christmas Labels Photoshop brushes /0,95Mb zipped/
And here’s a little example of a graphic made with Christmas Labels Photoshop brushes

Also, if you are a GBG Gold or Platinum member or if you decide that you want to become one, I prepared another free download for you!
Simple Christmas Trees Photoshop brushes [for Platinum GBG members only]:

Simple Christmas Trees Photoshop brushes set, video presentation
And a little something for Gold and Platinum GBG members:
Cute Labels Photoshop brushes

Cute Labels Photoshop brushes set, video presentation
OK. Gang, I hope you like new free downloads, videos and stuff and I just can’t help it, here is a little advice for all of you who won’t settle for less than 800+ Photoshop brushes:
Love you all!
xoxoxo
Popularity: 1% [?]
Do It Yourself Christmas Photo Card and this one is very easy – just “slide” your photo into the template.
Gang, Christmas is knocking on the door. For the most of us, this is the time we’ve been waiting for since January 2011. And, finally, it’s December which marks the beginning of - Good Times !
So, what do we do for Christmas? Loads of stuff, I know, but, one of the inevitable things we do is sending Christmas Cards!
And, for this purpose, I prepared one totally cool template (at least I’d like to believe it’s totally cool :)) which you can download, ”slide” your photo in and – voila! Christmas Photo Card is finished!
Today’s free download includes two transparent PNG files and one multilayered PSD file. (All in one zip file). PSD files contains images and wordings too!
[ Download Free Christmas cards here ]
To make this template I used:
Fonts:
Ma Sexy from dafont.com
Windsong from dafont.com
Photoshop brushes:
Christmas II Photoshop Brushes (20+20+20) + 20 PNGs

Christmas Photo Card with one photo – add some cool background or macro shot you have.

Christmas Photo Card with three photos – it can be your family members for instance.
Don’t forget you can edit the text too :) I mean, if you’re good with Photoshop you can edit everything, twist and tune it until you love it! ;)
OK, Gang, this was rather short … and sweet I hope. Don’t forget to check out the awesome Cyber Week sale I have here and keep that lovin’ feeling :)
xoxo
Silvia
Popularity: 2% [?]
Christmas time is coming and I know many of you, just like me, enjoy creating your own decorations at home, in the company of your friends and family. It’s more fun and these decorations have much bigger value than the ones bought in the mall.
So, today, I came up with this idea of creating a wreath. And, as a basis for it, I used styrofoam. I made it with the stuff I had at home and I hope you will like it enough to try and do something like this yourself, following this DIY tutorial.
1. Printing images
Print some of your photos, use images of your friends, family, or pets (as I did in this occasion) … in 2×2 inches size. Of course, I could not resist but to decorate my images with Photoshop brushes: Christmas II Photoshop Brushes (20+20+20) + 20 PNGs, and I used them as photo masks (there are few brushes in a set which can be used as photo masks too. Also I used one of the free Photoshop brushes from GreenBulbGang.Com – Grunge Stars)

And, well, I printed them out …

2. Preparation
Prepare the following: styrofoam, fabric, colorful fabric ribbons, wire, pine cones, gold color, glue gun.

3. Cutting the styrofoam (Part I)
Before cutting a circle, of course, we need to mark the styrofoam, I draw two circles using a pen, pick and a rope. No, that’s not my hand :) My hubby helped me.

4. Cutting the styrofoam (Part II)
That’s it. Now I had to cut it out. First I cut the smaller one. I know there is a styrofoam cutter, but I do not have it. So I used a simple knife. It was really messy. But I manage it.

5. Voila, that was the hardest part!
The hardest part is done! You can always buy something like this in a store. But I didn’t. Because this is DIY Christmas wreath :)

6. Dressing up
I dressed-up this wreath-to-be in a dark green cloth decorated with gold stars, moons and other drawings… I glued the cloth to the styrofoam with a glue gun. Yes, that’s me gluing the cloth :)

7. Dressing-up – completed
And, here’s the result:

8. Wiring and decorating
Now, I cut some wire and simply clasped it around the wreath-to-be. The upper part was twisted in a spiral so that we can insert the images. I didn’t have thicker wire. If I had a thicker wire I’d just pin it in the styrofoam. Also, I prepared pine cones and sprayed them with gold color.

9. Pine cones
Finally I glued the pine cones with a glue gun.

10. Inserting the photos
OK. That’s it. Now is time for printed images! Cut them, and glue them over the spiral wire. If you just attach them into spiral, they will fall off.

11. The final touch
I felt this wreath was missing something, so I added red and gold ribbons all around it.

12. OK. One more final touch
I added some bows around wires too!


13. And … voila!
Finito! bsilvia Christmas Wreath (2011/2012 edition) is ready! :))

I hope you will like it and maybe even try to do it yourself. Should you have any questions, let me know I will be more than happy to help.
Here is what Mr. SpaceCat thought of it:

Mr. Alphons was not impressed either

But, the old queen, Poofah, she wanted to eat the pine cones ?!?!?

Love you all, have fun and may the peace be with you.
Silvia
Commercial:
CYBER WEEK SALE! GET 1600+ High-Quality Photoshop brushes for peanuts. This week only.
Popularity: 1% [?]
Gang, what can I say?
HAPPY THANKSGIVING EVERYONE!!!

I made this little graphic with a little help from free Photoshop brushes and Photoshop textures from GreenBulbGang.Com :)
You might like it, or you may not. If you like it, you can download it and re-use it for any other possible purpose … or not.
It’s clearly, up to you.
[Download Thanksgiving graphic - layered PSD File] – zipped 27.2Mb, 8×8 inches @300 dpi – print ready!
Love you all!
I hope you are spending this day with your family, friends, people you care about, people you love.
Silvia
Popularity: 2% [?]
Download Damask Illustrator Brushes&Illustrator Christmas Card and short Illustrator Video Tutorial
Well, this is one of the multipurpose posts. Very useful. Here is what you get this time:
1. Using pattern brushes in Illustrator [tutorial]
2. Download Damask Pattern brushes (6) for Adobe Illustrator CS3 and newer versions
3. Last but not the least. Hereby, I would like to invite you to vote for Tammy Czigan in the “A Thousand Forests” Wacom contest. Tammy made this great project with one of my Photoshop brushes and I truly believe she deserves a vote.
4. Free Download: Illustrator Christmas Card, 6×8 inches @300dpi, zipped (1,5Mb)
* AI file (Adobe Illustrator CS 3 and newer versions)
* EPS file
* CDR file (CorelDraw 8.0 and newer versions)
* JPG file

Popularity: 2% [?]
Creating Pattern Brush in Adobe Illustrator is much more simple than you might think and this is what we will be talking about in this blog post (which also includes Free Download, of course) :)
Now, I made a video tutorial on this This is a short video tutorial on making pattern brushes in Adobe Illustrator (CS3).
These brushes can be used to create, for instance, frames, especially square and rectangle frames. They are free, even for your commercial projects but it would be great, awesome and very, very nice of you if you backlink to my blog (let alone the purchase from my shop) :)
Resizing:
In Pattern Brush Option Size go to Scale: (from 1% to 100%).
Coloring:
Coloring is not difficult too. In Pattern Brush Option -> Colorization chose Method: Tint.
Tomorrow I will make a video on re-sizing and coloring pattern brushes in Adobe Illustrator.
[ Download Damask Pattern brushes (6) for Adobe Illustrator CS3 ]
In this short video tutorial I used:
Damask Vector Set (22)
Set is delivered in following formats:
1. .ai (all CS versions from 8.0)
2. .eps format
3. .cdr (Corel 8.0 up to newer versions)
4. .png (so you can easily use them in any photo editing software)
5. .svg (SVG, or scalable vector graphics files can be read and modified by a large range of tools)
Commercial license included!
[ Preview Damask Vector Set ] [ BUY ]
Have a nice day,
Silvia
Popularity: 1% [?]
This post is going to be somehow different. It will be about our heart (not just heart graphic), positive energy vibration and quantum physics. It is, basically, something I wrote into my diary, but then I decided to share it with you:
…
Now it’s clear. It is the emotional vibration that makes things happen. It’s not the thoughts, although the thoughts can help to generate that emotional vibration.
Tesla also said that. Energy supersedes matter.
However, the real issue is – how to get into that emotional state of positive energy, love and happiness when the goin’ gets tough?
For instance, how cool would it be if we had a device which we could just plug in to get rid of of any negative emotions and get into the positive mode, so that we start emanating good vibrations and, as a consequence, start creating positive events in our 3D world as well.
A device. Fast solution. Many reach for narcotics to get closer to that emotional state, but narcotics are not doing it. It’s obvious. They are not working.
So, the device which will initiate positive vibrations from our body/mind/soul/consciousness/subconsciousness and put us in a mood of bliss.
Now, I am not talking about the device which will take energy from somewhere else and put it into us. We have the “ingredients for happiness” within ourselves already. I believe that it’s, probably, layers of energetic “dirt” what prevents this original, positive energy from coming out of us in difficult times.
So, as I said, the “ingredients” are already here, within us. It’s only a matter of putting them to work. This is what this device should do. It should pick up what’s already sitting there and put it to work.
OK. So, the idea for the device is here. I know what should it do and someone should jump in and actually make it :)
In the meantime, I will do what I do, here is another print ready card which you can use for multiple purposes, or you could just download it and explore the layers to see how it’s done.
[Download Heart Design Layered PSD File] – zipped 12.3Mb, 8×8 inches @300 dpi – print ready!
Love you all, guys. And until someone comes up with a machine like that I guess will just have to rely on our own capacity to keep our spirits up no matter what.
xoxoxo
Silvia
Popularity: 2% [?]
I used today’s free graphic to frame a photo of Mr. Alphons. (image above)
Today, I prepared a little something for scrapbookers. A layered Photoshop (PSD) file which is a digital scrapbooking “Quick Page”. It is a Photo mask at the same time. It is all that and more :)
So, if there is any human being still doing something else apart from writing posts and comments on Facebook, I count on you. I hope you will be reading this, maybe liking this download and maybe you will use it to create a nice graphic using some of your photos with it.
Regarding Facebook. I admit. I spend too much time on Facebook. I sit there every day for hours and I am not sure if I like that. So, I decided to proclaim one day of the week a No-Facebook day! I mean Facebook is nice, but we need to be careful before becoming slaves to the habit (unless it is a habit of creating stuff :))
Ladies and gentleman, let me present you
Digital Scrapbooking QuickPage / Photo Background / Photo Mask – layered Photoshop PSD file
(zipped, 6.5Mb, 8×8 inches @300dpi – print ready)
This image was created with free Photoshop brushes: Dotted Arrows available for all GBG Members!

Now, this is one short post.
I hope you are enjoying your Thursday, just bear with it cause Friday is already knocking on the door!
Enjoy!
xoxox
Silvia
Popularity: 2% [?]
Free Vector Art (Adobe Illustrator file)
And now, ladies and gentleman, something completely different. I guess I’ve given away enough of free layered PSD files in last few days and now it’s time for something new. Today, I am giving away vector art.
Now, you probably know why vector art is so cool. Of course. You can re-size it all you want and there will be no quality loss. But, that’s not all. If you are even remotely familiar with Adobe Illustrator, CorelDRAW or any other vector editing software, you will be able to, with few clicks of the mouse, turn it into something new and completely different, so originality is guaranteed.
Feel free to use this vector emblem in all your graphic design projects. But also, scrapbooks, tshirt design, commercials … whatever you could think of.
Today’s Free vector art download consists of the following vector file formats:
* CDR (CorelDRAW 8.0 and newer versions)
* AI (Adobe Illustrator 8.0 and newer versions)
* EPS
* SVG (scalable vector graphics files can be read and modified by a large range of tools)
* and PNG for all of you who do not use vector applications
All vector formats can be colored as you please, re-sized or changed in any other way – commercial use allowed. But, I will be more than happy if you drop a backlink to my blog :D
Download Free Vector Art – AI, EPS, CDR, SVG (and PNG) zipped
(zipped, 1.7Mb, PNG file is 8×8 inches @300dpi – print ready)
To create this Vector Art download I used:
Set is delivered in following formats:
1. .ai (all CS versions from 8.0)
2. .eps format
3. .cdr (Corel 8.0 up to newer versions)
4. .png (so you can easily use them in any photo editing software)
5. .svg (SVG, or scalable vector graphics files can be read and modified by a large range of tools)
Commercial license included!
I hope you will enjoy today’s free download!
Love you all,
Silvia
Popularity: 2% [?]
I know what you are thinking. “Why, on earth would I want to send a Christmas card in the middle of November?”
Of course, you would not. We still have a month and a half before Christmas.
But. Just like me, you will want to start thinking about preparing your Christmas design projects. Soon, just about anything you create will be decorated with Christmas decorations, isn’t it?
So, we better be ready and equipped with the right tools before the rush begins :)
Ladies and gentleman, I present you
Red and White Christmas Card, free PSD file
It is a layered PSD file so you can play with it, rotate design elements and make the card portrait or landscape, as you wish.
Download Christmas Card Template / New Year Greeting Card Template (or Christmas ecard, New Year card) – layered Photoshop PSD file
(zipped, 3.2Mb, 6×8 inches @300dpi – print ready)
Ingredients:
Font:
Loopi from dafont.com
Photoshop brushes:
Winter in Swirls Photoshop Brushes Set (33+33+33)
- 33+33+33 Photoshop brushes
- Compatible with Photoshop 7.0 up to CS5 and newer versions
- Compatible with Photoshop Elements 3.0 and newer versions
- Also compatible with PC/Mac
- COMMERCIAL LICENSE
Here, on our on-line graphical playground, I prepared some Christmas backgrounds and Photoshop brushes (digital stamps) for you to play with.
Test the brushes – Create your own Christmas e-Cards here
Here is how to use our simple graphics creator:
- Select the background
- Add text (select font and font color)
- Load the desired Photoshop brushes set into the brush picker
- Select the brush, color it, adjust transparency
- Rotate and re-size the brush before placing it on canvas
Use the keyboard shortcuts :
Ctrl (Cmd on Mac) and arrow keys (left, right, up and down) to rotate and re-size the brushes.
Please be patient after clicking on “Submit” button. It might take while before the email is sent. Thank you!
I hope you enjoyed my little Graphics Creator and the brushes included. One way or another, I’d love to hear what you thought of it.
Love you all!
xoxoxo
Silvia
Popularity: 7% [?]


